
How to Teach a Kid to Ride an Electric Dirt Bike Safely
Learning how to teach a kid to ride an electric dirt bike safely is mostly about patience, preparation, and a good plan. With the right bike, proper gear, and a calm step-by-step approach, your child can build real skills and have a great time doing it. This guide walks you through everything from choosing the bike and the practice spot to the exact drills that build balance, braking, and confidence.
Whether this is a holiday gift or a spring project, the steps below can help.They work for parents, grandparents, and anyone helping a young rider start. Read through the whole plan first, then go at your child’s pace, not the calendar’s.
Quick Takeaways
- Pick a bike that fits your child’s size and has controllable power, not the fastest one you can afford.
- Full protective gear is required for every ride, even the shortest one.
- Choose a flat, open, private area with no traffic, water, or steep slopes.
- Teach in small stages: bike basics, balance, starting and stopping, turning, then terrain.
- Stay close, stay calm, and keep every session short and positive.
- Check local rules before riding, since regulations differ by state and city.
Is Your Child Ready to Ride?
Age alone does not tell you whether a child is ready. Readiness is about physical size, coordination, attention, and maturity. Before you buy or plan a first ride, ask yourself these questions.
- Can they follow instructions? A rider has to listen, stop when told, and remember simple rules.
- Can they balance on a pedal bike? Comfort on a regular bicycle is a good sign of basic balance and steering.
- Can they reach the controls? Their hands should reach the brake levers and throttle comfortably, and their feet should reach the ground or the pegs.
- Do they understand the risks? Even young children can learn that the bike is a machine that needs respect, not a toy.
- Do they want to ride? A child who is eager learns faster and stays safer than one who is pressured.
If you are unsure, wait a little while. A few extra months of growth and maturity can make learning smoother and safer.
Choose the Right Bike for a Young Rider
The bike you choose matters more than any other decision. A bike that is too big, too heavy, or too powerful can turn a fun day into a frightening one. Look at these factors.
Fit Comes First
Seat height is the most important measurement. Have your child sit on the bike and see whether they can reach the ground with the balls of both feet. Check that they can hold the handlebars with a slight bend in their elbows, and that they can pull the brake levers without stretching.
Weight and Handling
A lighter bike is easier for a child to balance, push, and pick up. Have them walk the bike forward and backward, and try tilting it upright from the side stand. If they struggle to manage the weight, the bike may be too big.
Controllable Power
Electric motors deliver power instantly, so smooth throttle response and adjustable power settings matter. If a bike offers multiple ride modes, check the product page to see how they work, and always start in the lowest one.
Where to Look
Our Mini & Teen E-Motos collection is the best place to start for younger riders. Read the rider size and weight guidance on each listing and compare it with your child’s measurements before you order. If your child is an older teen, the Yozma IN-10 Pro is for teens and adults. Check its measurements to see if it fits them.
Gather the Right Safety Gear
Protective gear is not optional. Falls are a normal part of learning, and good gear turns many of them into minor bumps. Every rider should wear the full set on every ride, including quick practice sessions in the yard.
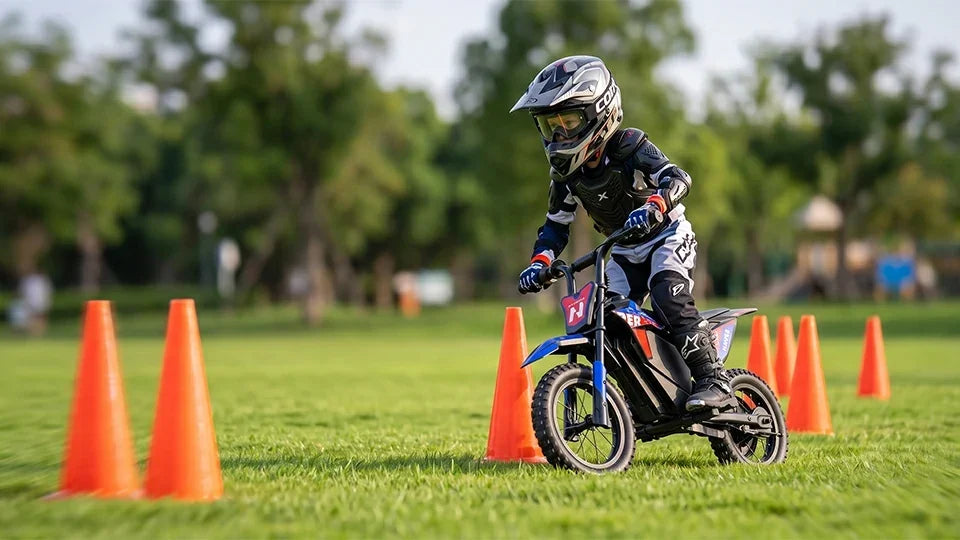
- Helmet: A properly fitted full-face helmet should feel snug without pressure points and should not move when your child shakes their head. Always fasten the chin strap.
- Goggles: They protect eyes from dust, dirt, and debris, and should seal comfortably with the helmet.
- Gloves: Choose a pair that lets your child feel the throttle and levers while protecting their hands.
- Boots: Sturdy boots with ankle support protect feet and give better traction at stops.
- Knee and elbow guards: These reduce the risk of scrapes and bruises during common tumbles.
- Chest protector and long sleeves and pants: They add another layer of protection against scrapes and impacts.
Gear that is too big can shift in a fall, and gear that is too small can limit movement. Try everything on, and make sure your child can move comfortably in it. Many gear makers offer youth sizes, so you should be able to find a good fit.
Set Up a Safe Practice Area
Where you practice shapes how safely your child learns. The ideal spot is flat, open, and private, with a forgiving surface such as short grass or smooth packed dirt.
What to Look For
- A flat area large enough to ride in wide circles.
- No roads, driveways, or parking lots nearby.
- No water, ditches, steep hills, or loose rocks.
- No pets, bystanders, or other vehicles in the riding zone.
- A clear view in every direction so you can supervise easily.
Mark Out Your Space
Use cones or sturdy markers to set up a simple course. A large oval works well for the first sessions, and you can add a figure eight and a straight braking lane later. Defined boundaries help your child focus and keep the bike inside a safe area.
Check the Rules
Most electric dirt bikes are designed for off-road use, and they are not treated like pedal e-bikes. Rules vary by state and city. Some places limit where children can ride. Some also require adult supervision or training. Check your local regulations and any rules on the land where you will ride before you start.
Do a Pre-Ride Check Every Time
A quick check takes only a couple of minutes and prevents many problems. Teach your child to do it with you so it becomes a habit.
- Battery: Make sure it is charged and securely in place.
- Brakes: Squeeze both levers and make sure they feel firm and respond smoothly.
- Tires: Check pressure and look for cuts or damage.
- Bolts and fasteners: Look for anything loose on the handlebars, wheels, and pegs.
- Throttle: Confirm it returns smoothly to the closed position when released.
- Gear: Check that the helmet, goggles, gloves, and boots are on correctly.
Teach the Bike Before You Ride It
Before the bike ever moves, spend time on the basics. Turn the bike off. Let your child sit on it. Have them hold the handlebars. Let them practice the brakes and throttle while the bike stays still.
Know the Controls
Explain what each part does in simple words. Show them the throttle, the brake levers, the power switch, and the stop or kill function if the bike has one. Have them practice reaching and pressing each control until they can do it without looking.
Practice Getting On and Off
Show them how to mount and dismount safely, using the side stand for stability. Practice a few times so it feels natural. Then show them how to tilt the bike upright if it falls, bending their knees and lifting with their legs.
Set Ground Rules
Agree on a few simple rules before the first ride. For example: always wear full gear, ride only in marked areas, stop when you raise your hand, and never ride without an adult watching. Clear rules prevent arguments and keep everyone safe.
A Step-by-Step Plan to Teach Your Child to Ride
This plan breaks learning into small, manageable stages. Move to the next step only when your child feels comfortable with the current one. You can spread the steps across several sessions.
Step 1: Walk the Bike
With the bike turned off, have your child walk beside it, then walk it while sitting and pushing with their feet. This builds a feel for the bike’s weight and balance without any power involved.
Step 2: Powered Walking Speed
Turn the bike on in the lowest power mode. Have your child gently twist the throttle to move forward at a slow walking pace, using their feet if they need to steady themselves. Then practice letting go of the throttle and braking to a smooth stop. Repeat until it feels easy.
Step 3: Straight Lines and Stopping
Ride in straight lines between two cones, then stop at a marker. Practice using both brakes gently and progressively, never grabbing them hard. Teach them to roll off the throttle first, then brake.
Step 4: Wide Turns
Ride large circles in both directions. Teach your child to look where they want to go, not at the ground in front of the wheel. Encourage them to keep their eyes up and turn the bars gently, leaning slightly into the turn.
Step 5: Tighter Turns and Figure Eights
Once large circles feel easy, tighten them gradually and add a figure eight. These drills improve balance, throttle control, and braking all at once.
Step 6: Standing on the Pegs
Show them how to stand on the pegs with their knees slightly bent, weight centered, and eyes forward. This helps them absorb bumps and gives them more control on rougher ground. Practice standing and sitting at slow speed.
Step 7: Gentle Terrain
When basic skills feel solid, try a gentle slope or a patch of smooth dirt with small bumps. Keep the pace modest and stay close. Terrain adds a new challenge, so expect some wobbles and keep the sessions short.
Power Settings: Go Slowly
The instant torque of an electric motor is exciting, but it can surprise a new rider. A child who twists the throttle too hard can lurch forward before they are ready. This is why the lowest power setting is the right place to start.
Stay in that setting until your child can start smoothly, stop reliably, and turn confidently without help. Only then consider moving up, and do it in small steps. If the bike has no lower setting and feels too powerful, that is a sign it may not be the right bike for a beginner.
Teach the Skills That Prevent Crashes
Good habits protect riders better than any piece of gear. Teach these skills early and repeat them often.
- Look ahead. Riders tend to steer toward whatever they stare at, so teach them to look where they want to go.
- Smooth hands. Gentle throttle and brake inputs keep the bike stable. Sudden grabs cause most beginner mistakes.
- Use both brakes. Practice a calm, progressive squeeze rather than a panic grab.
- Stay loose. A relaxed grip and bent knees and elbows absorb bumps better than a stiff body.
- Know how to stop in a hurry. Teach them to roll off the throttle, squeeze the brakes, and put a foot down.
- Know when to say stop. A rider who feels nervous or tired should always be allowed to end the session.
Supervision: How Close Is Close Enough?
Young riders should never ride unsupervised. Stay close to your child during the early stages. Keep them in your line of sight at all times, even as they improve.
Use simple signals so they can see and respond to you from a distance. A raised hand can mean stop, and a pointed finger can mean turn. If you can, have a second adult help so one person watches the rider while the other watches the area.
Also decide who is responsible for the bike’s power. Many parents keep the charger and keys, and turn the bike on only when they are present, so it cannot be used without supervision.
Keep Sessions Short and Positive
Kids learn best in short, fun sessions. Twenty to thirty minutes is often plenty at first. Stop before your child gets tired or frustrated, and end every session on a success, even a small one.
- Praise effort, not just results. Notice smooth stops, good posture, and careful decisions.
- Make mistakes normal. Falls and wobbles are part of learning, so stay calm and treat them as lessons.
- Add small games. Weaving between cones, stopping on a marker, or a gentle “follow the leader” makes practice enjoyable.
- Take breaks. Water, shade, and a snack help keep energy and attention high.
What to Do After a Fall
Falls are likely, so plan for them. Stay calm and walk over to your child. Turn the bike off, and check your child first. Ask how they feel, look for injuries, and let them rest. If there is any sign of a serious injury, especially to the head, neck, or back, stop riding and get medical help.
For minor tumbles, let them catch their breath, then talk about what happened. If they are ready, check the bike, adjust anything that needs fixing, and try again with a simple drill. If they are shaken, it is fine to end the session and come back another day.
Protect the Bike Too
Beginner riders will drop their bikes, and a few precautions help keep it in good shape. Our protection and fenders collection is worth browsing for parts that help guard the bike against scrapes and dirt. Always check that anything you add fits your specific model.
After each ride, wipe off dirt, check that nothing is loose, and store the bike in a dry place. Charge the battery with the supplied charger in a dry, ventilated area, and follow the manufacturer’s instructions.
Common Mistakes to Avoid
- Buying a bike to grow into. An oversized bike is harder to control and less safe.
- Skipping gear. Even short rides need full protection.
- Starting too fast. Begin in the lowest power setting and build up gradually.
- Practicing near hazards. Keep away from roads, water, slopes, and bystanders.
- Riding too long. Tired kids make more mistakes, so keep sessions short.
- Leaving the bike accessible. Keep the charger or key out of reach when no adult is present.
- Pushing a nervous child. Confidence grows faster when kids feel in control.
Frequently Asked Questions
What age can a kid start riding an electric dirt bike?
There is no single right age. Readiness depends on size, coordination, attention, and maturity. Follow the manufacturer’s rider guidance for each bike, and make sure your child can reach the controls and the ground comfortably.
What is the safest way to introduce a child to an electric dirt bike?
Start with a properly sized bike, full protective gear, and the lowest power setting. Practice in a flat, private area with close adult supervision, and build skills one step at a time.
What gear does my child need?
At minimum, a properly fitted full-face helmet, goggles, gloves, sturdy boots, and knee and elbow guards. A chest protector and long sleeves and pants add more protection.
How long should a first practice session be?
Twenty to thirty minutes is plenty for most beginners. Shorter sessions keep kids focused and positive, and you can always add time as their skills and stamina improve.
Are electric dirt bikes legal for kids to ride?
Rules vary by location. Most electric dirt bikes are made for off-road use. Local rules may limit where kids can ride. They may also require adult supervision. Check your state, city, and land rules before you start.
Is an electric dirt bike easier for a child to learn on than a gas bike?
Many parents find electric bikes simpler because there is no clutch or gear shifting. However, the instant torque still requires caution, so start with low power and plenty of practice.
Final Thoughts: Build Skills First, Speed Later
Teaching a child to ride well is a gradual process, and the best results come from patience and preparation. Choose a bike that fits, insist on full gear, practice in a safe space, and move through the steps at your child’s pace. Those habits protect your child today and set them up to ride well for years to come.
Take your time, keep it fun, and celebrate the small wins. A calm, confident young rider is the best result you can hope for.